이렇게 유용한 툴이 있을 줄이야~~
꼭 필요한 툴임.!! 강추
목업/ 스토리보드 작성/ 기획자 / 개발자 / 모두에게 필요한 프로그램.
스토리보드 작성을 쉽게 하자.

이건 trial 버전
모든 기능을 사용하려면 구매를 해야한다.


이렇게 유용한 툴이 있을 줄이야~~
꼭 필요한 툴임.!! 강추
목업/ 스토리보드 작성/ 기획자 / 개발자 / 모두에게 필요한 프로그램.
스토리보드 작성을 쉽게 하자.
이건 trial 버전
모든 기능을 사용하려면 구매를 해야한다.
http://holyqt.com/xe/hompi02/33804
1. yum 을 이용해서 Gnome 데스크탑을 설치합니다.
# yum -y groupinstall “X Window System”
# yum -y groupinstall “GNOME Desktop Environment"
2. KDE 데스크탑 환경 설치
# yum groupinstall "X Window System" "KDE (K Desktop Environment)"
3. 한글 패키지 설치 안되어 있으면 설치
   # yum install kde-i18n-Korean
   # yum install fonts-korean
4 . inittab 파일을 수정해서 부팅시 defult 모드를 GUI 모드로 변경합니다.
# vi /etc/inittab
id:3:initdefault: -> id:5:initdefault:
# restart
# startx
Could not open/read file:///etc/pki/rpm-gpg/RPM-GPG-KEY-oracle
yum install oracle-rdbms-server-11gR2-preinstall
설치 시 발생하는 오류
wget https://public-yum.oracle.com/RPM-GPG-KEY-oracle-ol6 -O /etc/pki/rpm-gpg/RPM-GPG-KEY-oracle
yum install oracle-rdbms-server-11gR2-preinstall
오류 해결 URL
http://dbafaq.wordpress.com/tag/could-not-openread-fileetcpkirpm-gpgrpm-gpg-key-oracle/
설치 방법
http://www.tecmint.com/oracle-database-11g-release-2-installation-in-linux/
http://www.oracle-base.com/articles/11g/oracle-db-11gr2-installation-on-oracle-linux-6.php
Oracle Linux 6
# cd /etc/yum.repos.d
# wget http://public-yum.oracle.com/public-yum-ol6.repo
# yum install oracle-rdbms-server-11gR2-preinstall
자동 설치
수동설치는
http://www.oracle-base.com/articles/11g/oracle-db-11gr2-installation-on-oracle-linux-6.php
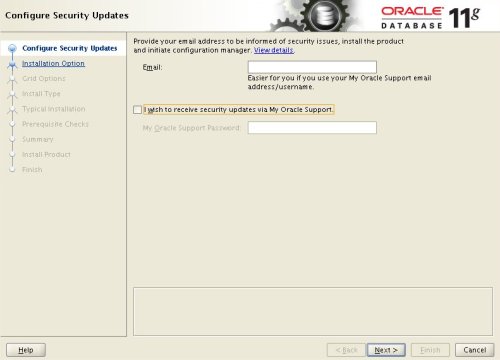
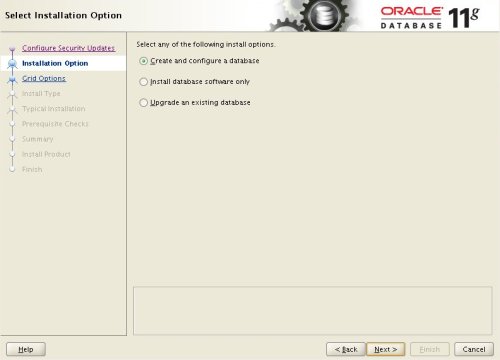
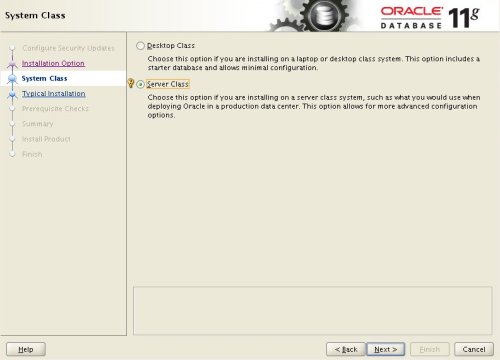
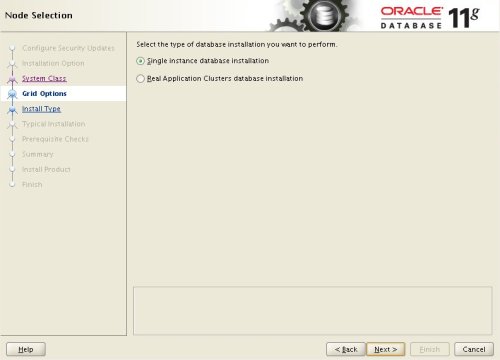
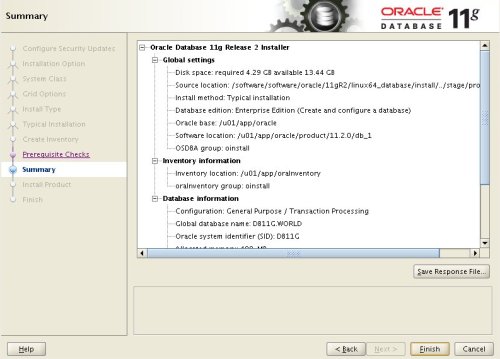
This article describes the installation of Oracle Database 11g Release 2 (11.2) (64-bit) on Oracle Linux 6 (64-bit). The article is based on a server installation with a minimum of 2G swap, with SELinux set to permissive and the firewall disabled. The following package groups were included for this installation.
An example of this type of Linux installations can be seen here. Alternative installations may require more packages to be loaded, in addition to the ones listed below.
Download the Oracle software from OTN or MOS depending on your support status.
Unzip the files.
# 11.2.0.1
unzip linux.x64_11gR2_database_1of2.zip
unzip linux.x64_11gR2_database_2of2.zip

#11.2.0.2
unzip p10098816_112020_Linux-x86-64_1of7.zip
unzip p10098816_112020_Linux-x86-64_2of7.zip

#11.2.0.3
unzip p10404530_112030_Linux-x86-64_1of7.zip
unzip p10404530_112030_Linux-x86-64_2of7.zip
You should now have a single directory called "database" containing installation files.
The "/etc/hosts" file must contain a fully qualified name for the server.
<IP-address> <fully-qualified-machine-name> <machine-name>
For example.
127.0.0.1       localhost.localdomain  localhost
192.168.0.181   ol6-112.localdomain    ol6-112
Perform either the Automatic Setup or the Manual Setup to complete the basic prerequisites. The Additional Setup is required for all installations.
If you plan to use the "oracle-rdbms-server-11gR2-preinstall" package to perform all your prerequisite setup, follow the instructions at http://public-yum.oracle.com to setup the yum repository for OL, then perform the following command.
# yum install oracle-rdbms-server-11gR2-preinstall
All necessary prerequisites will be performed automatically.
It is probably worth doing a full update as well, but this is not strictly speaking necessary.
# yum update
If you have not used the "oracle-rdbms-server-11gR2-preinstall" package to perform all prerequisites, you will need to manually perform the following setup tasks.
Oracle recommend the following minimum parameter settings.
fs.suid_dumpable = 1
fs.aio-max-nr = 1048576
fs.file-max = 6815744
kernel.shmall = 2097152
kernel.shmmax = 536870912
kernel.shmmni = 4096
kernel.sem = 250 32000 100 128
net.ipv4.ip_local_port_range = 9000 65500
net.core.rmem_default = 262144
net.core.rmem_max = 4194304
net.core.wmem_default = 262144
net.core.wmem_max = 1048586
The current values can be tested using the following command.
/sbin/sysctl -a | grep <param-name>
Add or amend the following lines in the "/etc/sysctl.conf" file.
fs.suid_dumpable = 1
fs.aio-max-nr = 1048576
fs.file-max = 6815744
kernel.shmall = 2097152
kernel.shmmax = 536870912
kernel.shmmni = 4096
# semaphores: semmsl, semmns, semopm, semmni
kernel.sem = 250 32000 100 128
net.ipv4.ip_local_port_range = 9000 65500
net.core.rmem_default=4194304
net.core.rmem_max=4194304
net.core.wmem_default=262144
net.core.wmem_max=1048586
Run the following command to change the current kernel parameters.
/sbin/sysctl -p
Add the following lines to the "/etc/security/limits.conf" file.
oracle              soft    nproc   2047
oracle              hard    nproc   16384
oracle              soft    nofile  4096
oracle              hard    nofile  65536
oracle              soft    stack   10240
Install the following packages if they are not already present.
# From Oracle Linux 6 DVD
cd /media/cdrom/Server/Packages
rpm -Uvh binutils-2*x86_64*
rpm -Uvh glibc-2*x86_64* nss-softokn-freebl-3*x86_64*
rpm -Uvh glibc-2*i686* nss-softokn-freebl-3*i686*
rpm -Uvh compat-libstdc++-33*x86_64*
rpm -Uvh glibc-common-2*x86_64*
rpm -Uvh glibc-devel-2*x86_64*
rpm -Uvh glibc-devel-2*i686*
rpm -Uvh glibc-headers-2*x86_64*
rpm -Uvh elfutils-libelf-0*x86_64*
rpm -Uvh elfutils-libelf-devel-0*x86_64*
rpm -Uvh gcc-4*x86_64*
rpm -Uvh gcc-c++-4*x86_64*
rpm -Uvh ksh-*x86_64*
rpm -Uvh libaio-0*x86_64*
rpm -Uvh libaio-devel-0*x86_64*
rpm -Uvh libaio-0*i686*
rpm -Uvh libaio-devel-0*i686*
rpm -Uvh libgcc-4*x86_64*
rpm -Uvh libgcc-4*i686*
rpm -Uvh libstdc++-4*x86_64*
rpm -Uvh libstdc++-4*i686*
rpm -Uvh libstdc++-devel-4*x86_64*
rpm -Uvh make-3.81*x86_64*
rpm -Uvh numactl-devel-2*x86_64*
rpm -Uvh sysstat-9*x86_64*
rpm -Uvh compat-libstdc++-33*i686*
rpm -Uvh compat-libcap*
cd /
eject
Note. This will install all the necessary 32-bit packages for 11.2.0.1. From 11.2.0.2 onwards many of these are unnecessary, but having them present does not cause a problem.
Create the new groups and users.
groupadd -g 501 oinstall
groupadd -g 502 dba
groupadd -g 503 oper
groupadd -g 504 asmadmin
groupadd -g 506 asmdba
groupadd -g 505 asmoper

useradd -u 502 -g oinstall -G dba,asmdba,oper oracle
passwd oracle
Note. We are not going to use the "asm" groups, since this installation will not use ASM.
Set the password for the "oracle" user.
passwd oracle
Amend the "/etc/security/limits.d/90-nproc.conf" file as described below. See MOS Note [ID 1487773.1]
# Change this
*          soft    nproc    1024

# To this
* - nproc 16384
Set secure Linux to permissive by editing the "/etc/selinux/config" file, making sure the SELINUX flag is set as follows.
SELINUX=permissive
Once the change is complete, restart the server.
If you have the Linux firewall enabled, you will need to disable or configure it, as shown here or here.
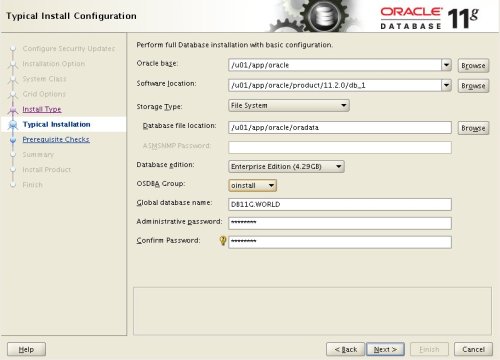
Create the directories in which the Oracle software will be installed.
mkdir -p /u01/app/oracle/product/11.2.0/db_1
chown -R oracle:oinstall /u01
chmod -R 775 /u01
Login as root and issue the following command.
xhost +<machine-name>
Login as the oracle user and add the following lines at the end of the ".bash_profile" file.
# Oracle Settings
TMP=/tmp; export TMP
TMPDIR=$TMP; export TMPDIR

ORACLE_HOSTNAME=ol6-112.localdomain; export ORACLE_HOSTNAME
ORACLE_UNQNAME=DB11G; export ORACLE_UNQNAME
ORACLE_BASE=/u01/app/oracle; export ORACLE_BASE
ORACLE_HOME=$ORACLE_BASE/product/11.2.0/db_1; export ORACLE_HOME
ORACLE_SID=DB11G; export ORACLE_SID

PATH=/usr/sbin:$PATH; export PATH
PATH=$ORACLE_HOME/bin:$PATH; export PATH

LD_LIBRARY_PATH=$ORACLE_HOME/lib:/lib:/usr/lib; export LD_LIBRARY_PATH
CLASSPATH=$ORACLE_HOME/jlib:$ORACLE_HOME/rdbms/jlib; export CLASSPATH
Log into the oracle user. If you are using X emulation then set the DISPLAY environmental variable.
DISPLAY=<machine-name>:0.0; export DISPLAY
Start the Oracle Universal Installer (OUI) by issuing the following command in the database directory.
./runInstaller
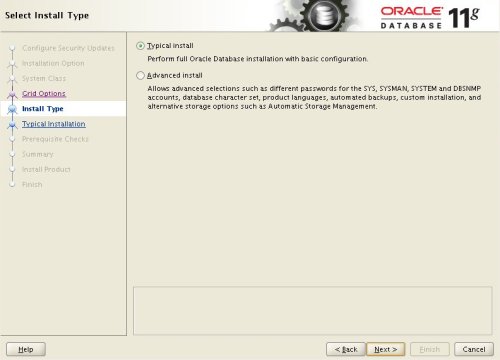
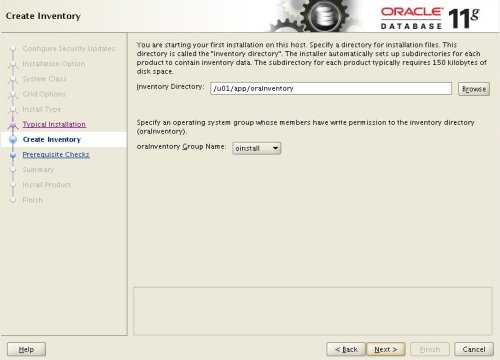
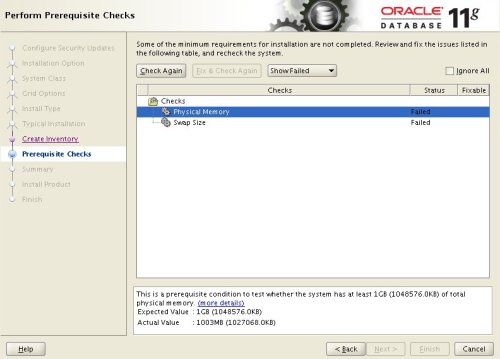
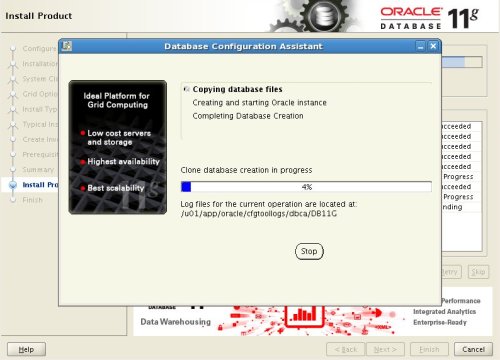
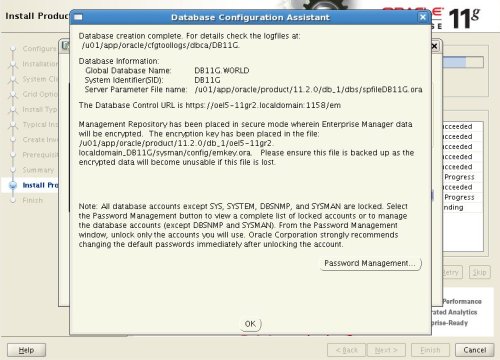
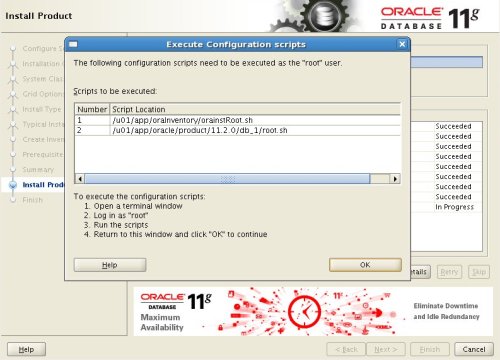
Proceed with the installation of your choice. The prerequisites checks will fail for the following version-dependent reasons:
You can see the type of installation I performed by clicking on the links below to see screen shots of each stage.
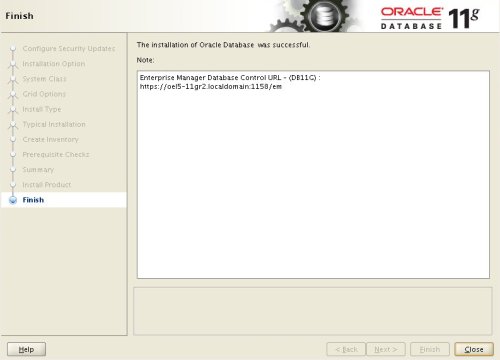
Edit the "/etc/oratab" file setting the restart flag for each instance to 'Y'.
DB11G:/u01/app/oracle/product/11.2.0/db_1:Y
"error code 35" : The machine name in the "/etc/hosts" file is not correct. It needs an entry for the loopback adapter (localhost) and the machine name. If you are using DNS for name resolution, you still need the loopback adapter reference in this file.
"error code 37" : The DNS not working properly. You may also get this error is the "/etc/hosts" file is not configured correctly.
"sqlplus: error while loading shared libraries: libclntsh.so.11.1" : The prerequisites have not been met. Work through them again. Specifically, make sure the "gcc" package has been installed.
Listener fails to start - Typically this is due to incorrect name resolution. Make sure the "/etc/hosts" and/or DNS is configured correctly.
Linking errors - Almost always due to missing prerequisites. Review the setup sections.
For more information see:
Hope this helps. Regards Tim...
public static boolean createThumbnail(String loadFile, String saveFile, int maxDim) throws IOException {
String suffix = loadFile.substring(loadFile.lastIndexOf('.') + 1).toLowerCase();
File save = new File(saveFile.replaceAll("/", "\\" + File.separator));
FileInputStream fis = new FileInputStream(loadFile.replaceAll("/", "\\" + File.separator));
BufferedImage im = ImageIO.read(fis);
Image inImage = new ImageIcon(loadFile).getImage();
double scale = (double)maxDim / (double)inImage.getHeight(null);
if (inImage.getWidth(null) > inImage.getHeight(null)) {
scale = (double)maxDim / (double)inImage.getWidth(null);
}
int scaledW = (int)(scale * inImage.getWidth(null));
int scaledH = (int)(scale * inImage.getHeight(null));
BufferedImage thumb = new BufferedImage(scaledW, scaledH, BufferedImage.TYPE_INT_RGB);
Graphics2D g2 = thumb.createGraphics();
g2.drawImage(im, 0, 0, scaledW, scaledH, null);
return ImageIO.write(thumb, suffix, save);
}
오래전 코드....이건 좀 구리다...
http://ezzimaro.tistory.com/54
C:\BitNami\redmine-2.3.2-1\apps\redmine\htdocs\plugins
git clone http://github.com/alexmonteiro/Redmine-Monitoring-Controlling.git redmine_monitoring_controlling
설치 : rake redmine:plugins:migrate RAILs-env=production
삭제 : rake redmine:plugins:migrate NAME=plugin_name VERSION=0 RAILS_ENV=production
tomcat-clustering-session-replication
nginx + tomcat clustering
http://www.ramkitech.com/2013/01/tomcat-clustering-series-part-5-nginx.html
 tomcat-clustering-session-replication--master.zip
You may ask why Nginx? There are many reasons which I’ll not going to write down here, but you can read the nginx testimonials here..! So lets take a look at the big picture, what we want is a server on the internet side will load the balance for the servers on LAN side. Easy, right :P We’ll have 1 load-balancer, 2 application and 1 database server. Well, let’s get started..

Let’s get rid of not necessary extra memory killer TTYs, I always use 2 :)
We are going to use CentOS 6 for our system infrastructure, so let us add EPEL and nginx repositories to /etc/yum/repos.d. For EPEL repository please readread this.
After adding the repositories
Let’s upgrade the system for each server
Load-balancer :
Application Servers :
I’ll not cover the database side, you can choose anything you like :)
Two configuration file is important here, /etc/nginx/nginx.conf and /etc/nginx/conf.d/default.conf
Important note: If you forget to add “ip_hash” into upstream when you start the load-balancer, your visitors will bounce from one application server to another. It’s not good if you’re deploying a session based mechanism into your application.
Nginx first..
What I did here is if any do,jsp or servlets requested they will come from Tomcat and the rest (other files except do,jsp or servlets) will be coming via Nginx. Cause it’s not Tomcat’s job to serve static files. Better way is to have an extra nginx server to serve statics files (css,js,jpg,png etc..)
And Tomcat
I’ll write a documentation about network and system optimization soon..
Load-balancer
Application Servers
If you want to start those services automatically in each reboot, you can add those services into startup services with chkconfig
Or you can use ntsysv but its not coming with CentOS minimal installation, you can install with
yum install ntsysv
So that’s it, bon appetit.. :)
/public/javascripts/application.js
function addTargetExternalLinks() {
  $('a.external').each(function() {
    $(this).attr('target','_blank');
  });
}

$(document).ready(addTargetExternalLinks);
루트 계정 접속
루트 홈 폴더에
.forward 파일 생성
vi .forward
root : abcd@gmail.com
저장 하면 끝...
 너는 개발자냐? by [czar] |
||


|
| 일 | 월 | 화 | 수 | 목 | 금 | 토 |
|---|---|---|---|---|---|---|
| 1 | ||||||
| 2 | 3 | 4 | 5 | 6 | 7 | 8 |
| 9 | 10 | 11 | 12 | 13 | 14 | 15 |
| 16 | 17 | 18 | 19 | 20 | 21 | 22 |
| 23 | 24 | 25 | 26 | 27 | 28 |

