windows 11 업데이트 - 확인이 필요한 항목 오류

증상 : 

따로 오류 내용이 나오지 않음.


검색 결과 :

검색 후  ms 에서 찾은 답변은 virtualbox 를 삭제하라는 답변이었음.

virtualbox 설치되어 있지 않음. 

위 화면처럼 확인이 필요한 항목도 나오지 않음.


다시 검색 windows 업데이트에서 보면 설치 상태가 35%에서 멈춰 있어서

windows update - windows 11 35% 관련으로 검색

[Best Fixes] Windows 11 Installation Stuck at 35%/85%... (minitool.com)

Causes of Windows 11 Insider Preview Installation Stuck

해결방법으로 아래 프로그램이 있는 경우 삭제 하고 시도하기

  • TeamViewer
  • VirtualBox
  • VMware Workstation Player
  • LDPlayer
  • dnplayerext2
  • BlueStacks
  • NOX Player
  • LinuxLive USB creator
  • UxStyle

LinuxLive USB creator 프로그램 내에 virtualbox 가 탑제되어 있었음.

LinuxLive USB creator 삭제 후  계속 업데이트 가능했음.


Posted by [czar]
,

[Docker][MySQL]Access denied for user ‘’@’172.17.0.1'(using password: YES)


Solution:

Step 1: access MySQL through docker container

docker exec -it <CONTAINER_ID> mysql -uroot -p

Enter password:

Welcome to the MySQL monitor. Commands end with ; or \g.

Your MySQL connection id is 360

Server version: 8.0.21 MySQL Community Server - GPL

Copyright (c) 2000, 2020, Oracle and/or its affiliates. All rights reserved.

Oracle is a registered trademark of Oracle Corporation and/or its affiliates.

Other names may be trademarks of their respectiveowners.

Type 'help;' or '\h' for help. Type '\c' to clear the current input statement.

mysql>


Step 2:

mysql> CREATE USER 'username'@'172.17.0.1' IDENTIFIED BY 'password';

Step 3:

mysql> GRANT ALL PRIVILEGES ON *.* TO 'username'@'172.17.0.1' WITH GRANT OPTION;

Step 4 :

mysql> flush privileges;
mysql> exit


접속 하기

Posted by [czar]
,

출처 : https://www.iotforall.com/iot-rest-api/

번역


세상을 먹고 있는 IoT: API 및 REST

RESTful API는 IoT 하드웨어 및 소프트웨어 개발자에게 IoT 시스템의 이질적인 구성 요소를 안정적으로 연결할 수 있는 좋은 표준 아키텍처를 제공합니다.

모두를 위한 IoT -

2018년 11월 12일


IoT는 기기의 80%가 IoT 기기가 될 것이라는 점을 고려할 때 산업혁명 이후 사회를 발전시킬 수 있는 가장 큰 잠재력을 가지고 있습니다. 그것은 모든 종류의 것들이 상호 연결되고, 똑똑하고, 의사 소통하고, 우리의 삶의 질을 향상시키는 세상을 안내할 것입니다. 그런데 IoT가 여전히 얕고 소비적이며, 주로 "1차 세계" 가젯에 초점을 맞추고 있는 이유는 무엇입니까? 소프트웨어가 산업을 변화시켰던 것처럼, 이제 인터넷에 연결된 데이터 스푸딩 장치를 통해 세상을 먹는 IoT라고 생각합니다. 여기에 모든 것이 연결됩니다. 우리는 현재 성장 스퍼트에 있다: 아날로그 기능 모니터링 및 통신 및 소프트웨어와 관련 된 디지털 기능에 물리적 세계를 관리 의 마이그레이션.

IoT를 사용하면 기본적으로 새로운 플랫폼을 발굴하고 있습니다. 여기에 비유가있습니다 : 스마트 폰 전에 일반 휴대 전화에센서, 스피커, 마이크 및 GPS가 있었지만 아무도 말하지 않았습니다. 그런 다음, 우리는 동일한 핵심 장치 위에 운영 체제를 넣어 - 수프 업 하드웨어와 albiet. 이제 하드웨어 기능은 개발자가 원하는 작업을 수행할 수 있는 API 집합으로 노출됩니다. 스마트 폰은 새로운 플랫폼을 노출하고, IoT는 지금 다시 같은 일을하고있다.

IOT에서 API는 어떤 역할을 합니까?

API(응용 프로그램 인터페이스)는 소프트웨어 응용 프로그램을 빌드하기 위한 루틴, 프로토콜 및 도구 집합입니다. 소프트웨어 구성 요소가 상호 작용하는 방식을 지정합니다. API는 연결된 장치를 고객에게 안전하게 노출할 수 있기 때문에 IoT와 긴밀하게 연결되어 있습니다. API는 자동차, 의료 기기,에너지 그리드 및 온도 조절기와 같은 중요한 "사물"을 생태계에 연결하므로 유연하고 확장 가능하며 안전한 API 관리를 배포하는 것이 중요합니다.

API는 서비스를 접착제화하고 통합할 수 있는 기능을 제공하므로 개발자는 응용 프로그램 자체와 응용 프로그램 상호 작용에 집중할 수 있습니다.트윗하려면 클릭하십시오.

API를 사용하면 개발자가 UI(근접 및 위치 인식)를 통해서만 상호 작용할 수 있는 컨텍스트 기반 응용 프로그램을 빌드할 수 있습니다. IoT를 진정으로 달성하기 위해서는 모든 장치에 대한 REST API가 필요합니다. REST를 사용하면 데이터가 인터넷 프로토콜을 통해 흐르고 승인을 위임하고 관리할 수 있습니다.

API는 사용하기 위해 "키"가 필요한 외부 서비스이거나 100% 무료및 공개적으로 사용할 수 있으며, 원래 엔터티에 등록할 필요 없이 사용할 수 있습니다. API의 도움으로 단일 앱은 REST라는 통합 된 아키텍처 스타일 덕분에 여러 프로그래밍 언어로 작성된 소프트웨어를 활용할 수 있습니다. IoT는 더 많은 앱을 구축하고 있다는 것을 의미하므로 IoT에서 어디로 가든 RESTful 서비스가 필요합니다.

비정형 데이터는 개체 저장소로 이동, 반 구조는 MongoDB로 이동, 카산드라, 기존의 트랜잭션 데이터는 SQL로 이동, MySQL 등등. 개발자로서 이러한 데이터 원본에서 노출된 독점 API를 처리하는 것은 어렵습니다. 하나의 비정형, 반구조화 및 하나의 구조화 된 데이터베이스를 앱에 통합하려면 적어도 3 개의 독점 API를 처리해야합니다. 이렇게 하면 생산성이 높지 않으며 응용 프로그램에 매우 이질적인 API를 혼합하고 일치시키기 때문에 코드가 오류가 발생하기 쉽습니다.

이미지 크레딧: 할리우드 매점

차선 칸막이, 횡단보도 또는 신호없이 도로를 사용하여 울창한 도시 트래픽을 통해 운전상상해보십시오. 그것은 완전한 혼란이 될 것입니다. 이것이 IoT의 현재 상태의 현실입니다. 전체적인 정보 디자인의 부족이 있다. 우리는 진정으로 상호 운용 가능한 기계 간 연결이 나올수 있도록 정보의 흐름을 표준화해야 합니다. 고맙게도, REST API는 우리에게 거기에 방법의 일부를 취할 수 있습니다.

IoT 시스템 내에서 연결을 플로팅할 때 노드는 장치이고 호는 API입니다. 실제로 IoT가 제공하는 이점을 완전히 실현하려면 OT 자산은 상호 작용을 위한 HTTP, SSL/TLS 암호화 및 데이터 보안을 위한 인증, 데이터 형식에 대한 JSON과 같은 웹 기술로 직접 구축된 웹 기술로 설계되어야 합니다. 이 방법은 오늘날 RESTful 아키텍처를 통해 사용할 수 있습니다.

REST - 개발자의 가장 친한 친구

REST (나는 당신이 아직 기억하기에 충분한 약어가 있다고 생각하지 않았다) 표현 상태 전송을 의미하고 개념, 프로토콜이 아닙니다. 그러나 오늘날 가장 널리 사용되는 API 형태의 기초입니다. RESTful API는 현대 웹에서 널리 사용되며 일반적으로 HTTP를 통해 JSON 또는 XML을 사용하여 데이터 전송이 이루어집니다. REST는 클라이언트가 필요에 따라 API를 연결하고 소비하여 사용 시 요청과 관련된 모든 데이터를 전달하는 등 상태없는 개념입니다. 지속적으로 열린 연결을 유지관리하지 않으므로 확장성이 매우 큽습니다.

RESTful인 앱은 API가 보편적인 아키텍처 요구 사항 집합을 따르는 앱으로, 여러 프로그래밍 언어가 통합된 방식으로 API에 쉽게 연결할 수 있도록 합니다. REST는 비눗기와 같은 작업 기반 대신 리소스 기반입니다.

REST API는 일반적으로 HTTP 사양의 메서드를 사용하여 다른 작업을 수행합니다. 예를 들어 POST, GET, PUT, DELETE를 SQL CREATE, SELECT(읽기), 업데이트 및 삭제 함수에 논리적으로 매핑할 수 있습니다. 이를 CRUD라고 하며, 리모트 API를 통해 원격 서버에 저장된 데이터 조각에 대해 수행할 수 있는 모든 작업을 예측할 수 있음을 의미합니다.

REST는 중요한 역할을 하며 스택 전체에서 REST를 사용할 수 있습니다. REST는 웹에 대한 사실상 프로토콜이되었습니다. 그것은 거의 모든 웹 서버에 의해 이해, 그리고 인터넷에서 거기 밖으로 끝점. IoT는 REST 엔드포인트를 많이 활용합니다. MQTT와 같은 다른 프로토콜이 있지만 후자는 여전히 진화하고 있습니다. Lot의 서비스는 REST에 의존하므로 여러 서비스를 결합하는 접착제인 IoT 인프라를 신속하게 조립할 수 있습니다.

IoT에 대한 확실성은 인터넷입니다. 인터넷을 통해 통신하는 거의 보편적인 방법 응용 프로그램 및 장치는 RESTful 서비스를 통해 통신합니다. REST API는 연결된 응용 프로그램과 "사물"이 표준의 잘 이해된 방식으로 상호 작용할 수 있는 가장 간단한 방법을 제공합니다. 또한 이러한 연결된 모든 사물의 데이터를 다양한 데이터베이스 유형에서 수집, 저장 및 처리해야 합니다. 일관된 REST API는 이러한 다양한 작업을 수행하는 가장 효율적인 방법입니다.

REST 주소:

  • 성능
  • 확장성
  • 인터페이스의 단순성
  • 수정 가능성
  • 가시성
  • 이식성
  • 신뢰성

REST는 HTTP를 사용하기 때문에 웹에 연결하고 웹 페이지를 요청할 수 있는 모든 장치는 REST API를 사용할 수 있습니다. REST는 각 장치가 상태 정보를 쉽게 사용할 수 있도록 할 수 있으며 해당 데이터를 생성, 읽기, 업데이트 및 삭제하는 방법을 표준화할 수 있기 때문에 IoT에 좋은 모델입니다. 개발자는 많은 IoT 장치에 대한 REST 모델을 신속하게 빌드할 수 있습니다. 그런 다음, 예를 들어, 쉽게 전구의 상태를 얻을 수 있습니다(예 : "꺼져"). 그런 다음 요청을 켜도록 보낼 수 있습니다. 또는, 당신은 공간 히터에서 현재 온도를 얻을 수 있습니다(예를 들어"너무 뜨겁다"), 그 후 당신은 낮은 목표 온도를 보낼 수 있습니다. 이 모델은 직관적으로 문제의 전체 호스트와 일치합니다.


IoT 시스템 개발에 필요한 것

사물 인터넷 제품의 진정한 트릭은 효율적이고 빠른 방식으로 데이터를 이동하는 것이므로 모든 IoT 구현의 중심에 API(들)가 있습니다. 올바르게 수행하면 API가 개발 속도를 높일 수 있습니다. 궁극적으로 사용자에게 데이터를 원활하게 전달하는 경우 실제로 사용자의 환경을 향상시킬 수 있습니다.

장치 사람과 소프트웨어 사람들은 거의 서로를 이해하지 못합니다. 장치 담당자의 경우 API는 제품이며 앱 개발자가 주요 소비자입니다. 장치에 대한 API를 빌드할 때 는 디자인 과 지배적 인 웹 아키텍처를 모방하는 기본 프로토콜 측면에서 소비자의 요구를 이해해야합니다.

REST 및 JSON API는 일반적으로 소프트웨어 엔지니어가 새로운 앱을 빌드할 때 휠을 재창조하지 않도록 할 수 있도록 합니다. REST는 주요 웹 아키텍처이며 웹에서 응용 프로그램을 빌드할 경우 이에 반대하지 않는 아키텍처 트렌드를 사용하여 작업해서는 안 됩니다.

소프트웨어 개발자가 복잡성을 알지 않고도 장치작업을 더 쉽게 할 수 있도록 하면 개발자가 IoT에 더 쉽게 액세스할 수 있습니다. REST API는 문제를 추상화하고 인터페이스로 노출하여 개발자가 모바일 앱을 빌드할 때 기존 백엔드 시스템에서 작업하는 것처럼 장치를 프로그래밍할 수 있도록 하기 때문에 이 문제를 아름답게 해결합니다. 소프트웨어 개발자에게 이러한 시나리오에서 전구를 켜면 다른 소프트웨어 시스템을 조작하는 것과 비슷합니다.

풍부한 저자 피터 디아만디스와 스티븐 코틀러는 이 모바일 개발이 소프트웨어를 통해 새로운 기술과 교육을 도입하여 빈곤 감소를 가장 많이 경험할 수 있는 개인들에게 "10억 달러 상승"하는 것이 가장 중요하다고 말합니다.

2015년 7월, CA 테크놀로지스와 API 아카데미의 샘 맥클린은 "앞으로 모든 성공적인 회사가 소프트웨어 회사가 될 것이며 모든 성공적인 소프트웨어 회사가 API 제공업체가 될 것"이라고 주장했다.

강력하고 사용자 친화적인 API를 갖춘 고품질 소프트웨어 덕분에 비즈니스와 솔루션의 성장을 목격하고 있습니다. 인류는 코더와 비 코더에 대한 더 많은 작업을 모두 채우기 위해 사람들보다 사용할 수있는 응용 프로그램 중심의 미래에 직면하고있다.

우리는 IoT 채택의 "하키 스틱"단계에 있습니다. 지금은 IoT 프로젝트를 공식화하고 개발하기 시작하는 가장 좋은 시기입니다. 데이터를 활용할 수 있는 많은 흥분과 잠재력이 있으며 장치 측면과 소프트웨어 측면에서 수많은 개발 기회가 있습니다. 그러나 아직 갈 길이 멀다. 휴식을 취하십시오.

알렉스 보웬, 작가, 디지털 전략가, 커뮤니티 빌더에 의해 작성되었습니다.


Posted by [czar]
,

Streaming Live to YouTube and Facebook using Raspberry Pi Camera

https://www.digikey.com/en/maker/blogs/streaming-live-to-youtube-and-facebook-using-raspberry-pi-camera


step0
install raspbian and configure network.

step 1
sudo apt-get update
sudo apt-get dist-upgrade
sudo apt-get install git
git clone https://github.com/silvanmelchior/RPi_Cam_Web_Interface.git
cd RPi_Cam_Web_Interface
./install.sh
./remove


step2
sudo nano /etc/apt/sources.list
add this line
deb http://www.deb-multimedia.org jessie main non-free


step 3
sudo apt-get install ffmpeg

if all ok, confirmation message from ffmpeg.
Posted by [czar]
,

https://www.cloudbooklet.com/how-to-install-tomcat-9-on-ubuntu-18-04-google-cloud/


Prerequisites

  1. Your Compute Engine Instance running.
  2. For setting up Compute Engine, see the Setting up Compute Engine Instance.

Step 1: Install Java

Once your Google Compute Engine is up and running, connect to your instance using SSH and start by updating the packages.

sudo apt update 
sudo apt upgrade

Now you can install OpenJDK Java. Java is required fot Tomcat to serve Java applications.

sudo apt install default-jdk

Now Java will get installed and then you can proceed to create tomcat user.

Step 2: Create and Setup Tomcat User

For security purposes we shall create a non root user to run the Tomcat service.

sudo groupadd tomcat

Now you can create a new tomcat user and assign it to the home directory /opt/tomcat where we are going to install Tomcat.

sudo useradd -s /bin/false -g tomcat -d /opt/tomcat tomcat

Step 3: Install Tomcat

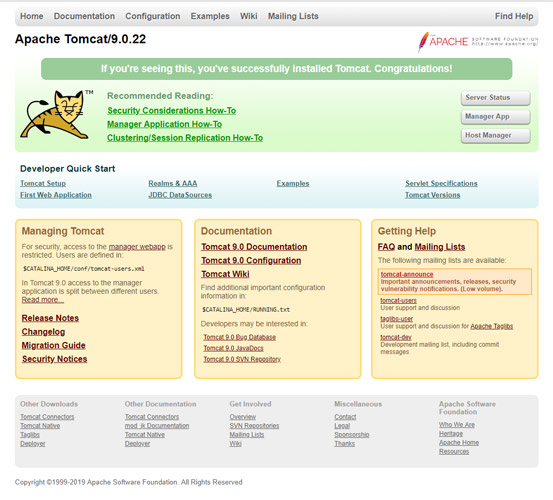
Now download the latest binary release of Tomcat for the official Tomcat downloads page. Under the Binary Distributions, under Core, copy the link of the file with extension tar.gz

Create the directory for Tomcat installation.

sudo mkdir /opt/tomcat

Download Tomcat with the link you have copied.

cd /tmp 
curl -O http://mirrors.estointernet.in/apache/tomcat/tomcat-9/v9.0.22/bin/apache-tomcat-9.0.22.tar.gz 
sudo tar xzvf apache-tomcat-9.0.22.tar.gz -C /opt/tomcat --strip-components=1

Step 4: Setup Permissions

Move to the directory of the Tomcat installation.

cd /opt/tomcat

Setup correct permissions for tomcat user.

sudo chgrp -R tomcat /opt/tomcat 
sudo chmod -R g+r conf 
sudo chmod g+x conf 
sudo chown -R tomcat webapps/ work/ temp/ logs/

Step 5: Create Service

To run Tomcat as a service you need to setup this with a systemd service file.

Locate the path of Java installation. Execute the below command to find the installation path.

sudo update-java-alternatives -l
Output java-1.11.0-openjdk-amd64 1081 /usr/lib/jvm/java-1.11.0-openjdk-amd64

Now, create a new file for Tomcat inside /etc/systemd/system directory.

sudo nano /etc/systemd/system/tomcat.service

Make sure to modify the JAVA_HOME with the path of your Java installation.

[Unit]
Description=Apache Tomcat Web Application Container
After=network.target

[Service]
Type=forking

Environment=JAVA_HOME=/usr/lib/jvm/java-1.11.0-openjdk-amd64
Environment=CATALINA_PID=/opt/tomcat/temp/tomcat.pid
Environment=CATALINA_HOME=/opt/tomcat
Environment=CATALINA_BASE=/opt/tomcat
Environment='CATALINA_OPTS=-Xms512M -Xmx1024M -server -XX:+UseParallelGC'
Environment='JAVA_OPTS=-Djava.awt.headless=true -Djava.security.egd=file:/dev/./urandom'

ExecStart=/opt/tomcat/bin/startup.sh
ExecStop=/opt/tomcat/bin/shutdown.sh

User=tomcat
Group=tomcat
UMask=0007
RestartSec=10
Restart=always

[Install]
WantedBy=multi-user.target

Hit Ctrl + X followed Y and Enter to save and exit the file.

Reload the systemd daemon.

sudo systemctl daemon-reload

Now you can start Tomcat server.

sudo systemctl start tomcat

Finally enable Tomcat to startup on system boot.

sudo systemctl enable tomcat

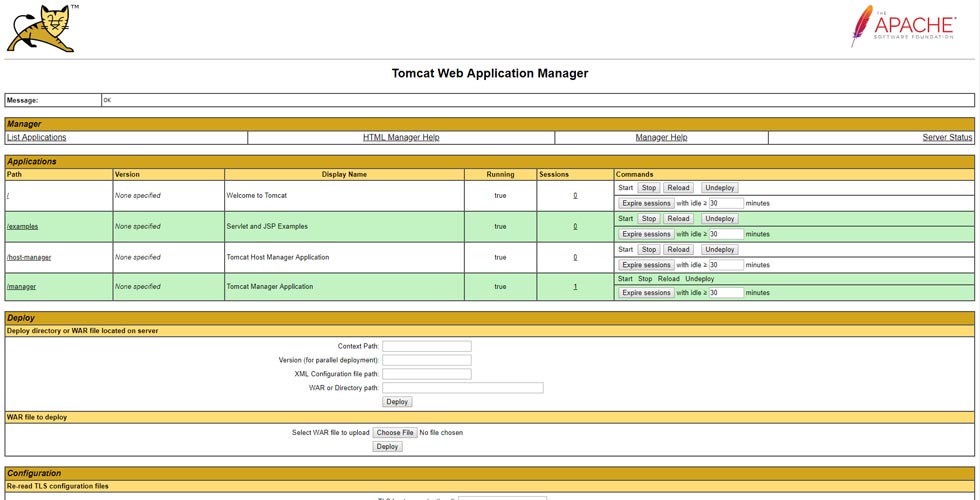
Step 6: Configure Tomcat

To use the manager web app you need to login to the server. To setup your username and password edit the tomcat-users.xml file and edit the username and password.

sudo nano /opt/tomcat/conf/tomcat-users.xml<tomcat-users . . .> <user username="admin" password="password" roles="manager-gui,admin-gui"/> </tomcat-users>

Hit Ctrl + X followed Y and Enter to save and exit the file.

By default Tomcat restricts access to Manager and Host manager. So, to allow connections you need to remove the IP restrictions from the corresponding context.xml files.

For the Manager app the file that needs be updated is:

sudo nano /opt/tomcat/webapps/manager/META-INF/context.xml

For the Host Manager app the file that needs be updated is:

sudo nano /opt/tomcat/webapps/host-manager/META-INF/context.xml

Comment out the value section to remove the IP restriction as shown below.

<Context antiResourceLocking="false" privileged="true" > <!--<Valve className="org.apache.catalina.valves.RemoteAddrValve" allow="127\.\d+\.\d+\.\d+|::1|0:0:0:0:0:0:0:1" />--> </Context>

Hit Ctrl + X followed Y and Enter to save and exit the file.

Step 7: Configure Firewall

By default Tomcat runs on port 8080, So you need to open port 8080 to allow connections.

In your Google Cloud Console go to VPC Network >> Firewall rules and click Create Firewall rules.

In Name enter tomcat

In Targets select All instances in the network

In Source filter select IP ranges

In Source IP ranges enter 0.0.0.0/0

In Protocols and ports check TCP and enter 8080.

Click Create.

Step 8: Access Web Interface

Now you can access your Tomcat web manager with your external IP address followed by port 8080.

http://IP_ADDRESS:8080

You will see the Tomcat welcome page.

Tomcat Web Application Manager page.

Tomcat Virtual Host Manager.

Conclusion

Now you have installed Tomcat 9 on Ubuntu 18.04, configured it, opened Firewall port. You can feel free to deploy your Java applications.

Posted by [czar]
,

for user in $(cut -f1 -d: /etc/passwd); do echo id $user; crontab -u $user -l ; done

Posted by [czar]
,

https://nopistash.wordpress.com/2018/05/03/centos7-nginx-conflicting-module-versions/


CentOS7, Nginx conflicting module versions

Today I encountered a conflict between existing and expect nginx module versions. The error message from systemctl status nginx was:
nginx: [emerg] module "/usr/lib64/nginx/modules/ngx_http_geoip_module.so" version 1012002 instead of 1014000 in /usr/share/nginx/modules/mod-http-geoip.conf:1

After a little searching I realised that the modules was not installed from nginx official repository as the nginx server was but instead from epel, this caused the version conflict.

To solve this first uninstall all the modules from the epel repository:
$ sudo yum remove nginx-mod*

The install the modules provided by the official repository:
$ sudo yum install nginx-module-*

If you don’t want to install all the modules replace the wildcard with the specific module(s) you want. The modules can be found using sudo yum search nginx-module

And restart the server:
$ sudo systemctl restart nginx


Posted by [czar]
,

Remove residual config files in Ubuntu – A one liner

I have spent literally hours over the last year or two searching for an elegant way to remove configuration files left over from package installs, in a command line environment, with Ubuntu.

Googling would provide a frustrating list of solutions that would either involve installing extra packages, using a complicated command line, or script, solutions that I would never be happy with and would “redo” the search again, each time I wanted to perform the same task, in the hope of finding something better.

In the end Aptitude and Xargs were my friends. Without further ado ….

aptitude -F %p search '~c' | xargs dpkg -P

Please note this command is meant for server/cli environments only. Desktop users should use Synaptics and the “Not Installed (residual config)” status. Nanny out.


https://johnlewis.ie/remove-residual-config-files-in-ubuntu-a-one-liner/


Posted by [czar]
,
# yum -y install mysql-community-server
# systemctl start mysqld
# systemctl enable mysqld
# mysql


# vi /etc/my.cnf
[client]
default-character-set = utf8
[mysql]
default-character-set=utf8
[mysqld]
datadir=/var/lib/mysql
socket=/var/lib/mysql/mysql.sock
character-set-server=utf8
collation-server=utf8_general_ci
init_connect=SET collation_connection = utf8_general_ci
init_connect=SET NAMES utf8
character-set-client-handshake = FALSE
skip-character-set-client-handshake
[mysqldump]
default-character-set=utf8


여기까지 설정 변경


# systemctl restart mysqld
# mysql
mysql> status


Posted by [czar]
,


We are using RxJava in android and combine result. I have explained each and every step
Let’s first define our Retrofit object to access Github’s API, then setup two observables for the two network requests above:

Retrofit repo = new Retrofit.Builder()
        .baseUrl("https://api.github.com")
        .addConverterFactory(GsonConverterFactory.create())
        .addCallAdapterFactory(RxJavaCallAdapterFactory.create())
        .build();

Observable<JsonObject> userObservable = repo
        .create(GitHubUser.class)
        .getUser(loginName)
        .subscribeOn(Schedulers.newThread())
        .observeOn(AndroidSchedulers.mainThread());

Observable<JsonArray> eventsObservable = repo
        .create(GitHubEvents.class)
        .listEvents(loginName)
        .subscribeOn(Schedulers.newThread())
        .observeOn(AndroidSchedulers.mainThread());

The Retrofit interfaces are simple enough:

public interface GitHubUser {
  @GET("users/{user}")
  Observable<JsonObject> getUser(@Path("user") String user);
}

public interface GitHubEvents {
  @GET("users/{user}/events")
  Observable<JsonArray> listEvents(@Path("user") String user);
}

Lately we use RxJava’s zip method to combine our two Observables and wait for them to complete before creating a new Observable.

Observable<UserAndEvents> combined = Observable.zip(userObservable, eventsObservable, new Func2<JsonObject, JsonArray, UserAndEvents>() {
  @Override
  public UserAndEvents call(JsonObject jsonObject, JsonArray jsonElements) {
    return new UserAndEvents(jsonObject, jsonElements);
  }
});

What’s the UserAndEvents? It’s just a simple POJO to combine the two objects:

public class UserAndEvents {
  public UserAndEvents(JsonObject user, JsonArray events) {
    this.events = events;
    this.user = user;
  }

  public JsonArray events;
  public JsonObject user;
}

Finally let’s call the subscribe method on our new combined Observable:

combined.subscribe(new Subscriber<UserAndEvents>() {
          ...
          @Override
          public void onNext(UserAndEvents o) {
            // You can access the results of the 
            // two observabes via the POJO now
          }
        });


Posted by [czar]
,